English version was created automatically using Drupal module auto_node_translate and free DeepL translator.
How to set up a Debian 9 Strech server with Xfce for use without a monitor using xserver-xorg-video-dummy and access it via TeamViewer
published on 2019-06-11
In my case, I need access to a remote server where I run a couple of virtuals. The easiest way for me is to use TeamViewer to connect to the server, where I can then see all the running virtuals, and of course I can do other things as if I were sitting right at the server.
There are a lot of similar tutorials on the Internet, but I was struggling with the correct order of actions or some other problem, because I always got stuck after sending the login dialog to the system.So I wrote a step-by-step tutorial.
By the way, you can try this whole tutorial in a virtual server before you start working on a real server.
1 Minimal Debian 9 Stretch Installation
To start with, you need a minimal system, so just the "standard system utilities" and probably the "SSH server".
No need to install "Debian desktop environment" or Xfce.
2) Dummy video driver xserver-xorg-video-dummy
Since we won't have any monitor connected, we'll install the dummy package.
apt-get install xserver-xorg-video-dummy
This will install all the necessary packages to run the X-server.
Now we need to set up a dummy display - in the /etc/X11/xorg file.conf you need to write the following:
Section "Device" Identifier "Configured Video Device" Driver "dummy" VideoRam 16384EndSection
Section "Monitor" Identifier "Configured Monitor" HorizSync 5.0 - 1000.0 VertRefresh 5.0 - 200.0 Modeline "1600x900" 33.92 1600 1632 1760 1792 900 921 924 946EndSection
Section "Screen" Identifier "Default Screen" Monitor "Configured Monitor" Device "Configured Video Device" DefaultDepth 24 SubSection "Display" Viewport 0 0 Depth 24 Virtual 1600 900 EndSubSectionEndSection
You can probably find other configurations for different resolutions on the internet, or you can find a different configuration for different resolutions.
3) Installing the Xfce graphical environment
You can obviously install whatever you want (https://wiki.debian.org/DesktopEnvironment), but Xfce is small and simple, so it's suitable for running on a server.
apt-get install xfce4
This will install all the necessary packages to run the X-server, including lightdm. Recommended additional packages for Xfce are xfce4-terminal, mousepad (editor) ... I also disable Screen Locker (Applications > Settings > Session and Startup).
4) Installing TeamViewer 14
The .deb installation package is available for download here https://www.teamviewer.com/en/download/linux/, as well as a link to System requirements & Installation notes. It's not rocket science, but it's important not to do it in the root directory, but for example in /opt:
cd /optapt install ./teamviewer_amd64.deb
During the installation, the repository for TeamViewer /etc/apt/sources.list.d/teamviewer will be added.list Since I don't want automatic updates, this repo can simply be disabled
teamviewer repo disable
Further commands can be found using teamviewer -help, other important ones are
teamviewer daemon enableteamviewer license acceptteamviewer passwd [PASSWD]teamviewer info
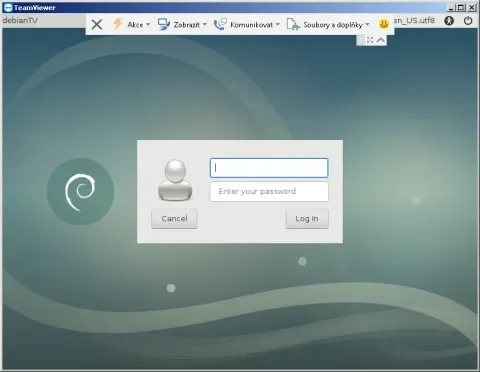
5) Reboot and test connection
After rebooting the machine, we can try to log in using TeamViewer - we know the session ID and password, so the login dialog should appear. Once logged in, we should see Xfce.
6) Install VMware player or VirtualBox
Nothing complicated:
But before that, install
apt-get install build-essential linux-headers-$(uname -r)7) Autologin
I still like to have the user automatically tasked after reboot, and also have the virtual machines start automatically.
vi /usr/share/lightdm/lightdm.conf.d/01_debian.conf
Lines need to be added here
[SeatDefaults]autologin-user=userautologin-user-timeout=0
And autostart applications can be set in Applications >> Settings > Session and Startup
In conclusion
As usual, once you know the way, it's not a big deal. Still, there may be a snag in each of the points above, so once again - it's better to try it out in a virtual first, then on the server. Thanks to this, one does not waste time and can start working remotely.