English version was created automatically using Drupal module auto_node_translate and free DeepL translator.
Stripe Series #4: Stripe Invoicing - how it works and how to get it working in Drupal
published on 2021-07-21
In this fourth installment on Stripe, we'll take a closer look at Stripe Invoicing, the solution I've chosen to use. As a bonus, we'll see how to connect it all with SalesForce and Hopin.
From the previous episodes of the Stripe series, it's clear why I ultimately chose the Stype Invoicing solution. So, let's take a look at specifically how to do it.

Stripe and Drupal
There is definitely an integration for Drupal with the entire e-commerce solution, Drupal Commerce, specifically with the Commerce Stripe module https://www.drupal.org/project/commerce_stripe. But you don't need to run Drupal Commerce at all to connect to Stripe, just install the Stripe modulehttps://www.drupal.org/project/stripe or Stripe APIhttps://www.drupal.org/project/stripe_api, which integrate the Stripe PHP library into Drupal. There's also Stripe's webform integration module https://www.drupal.org/project/stripe_webform for easy integration with Webform.
Solution Design
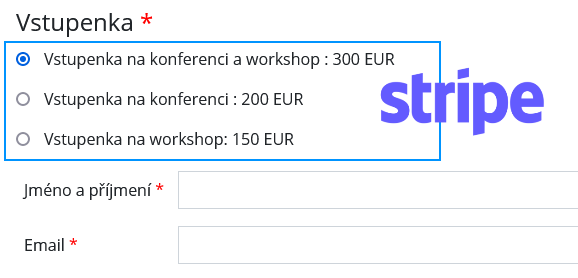
First, let's describe what we'll actually be creating as we go along. Suppose we want to sell "tickets" to a virtual event, either to a morning conference, or to an afternoon workshop, or both.
- Creating Products/Prices in Stripe
- Registration page with form - custom form with list of Products from Stripe and custom fields like name, email ...
- Summary page, for final overview - back and pay buttons
- Redirect to Stripe Hosted Invoice page, automatically send Invoice to customer
- After successful payment send Receipt to customer and send notification to yourself on mail
- BONUS: SalesForce and Hopin
1. Create Product/Prices in Stripe
According to the solution proposal, we will create 3x Product, with appropriate Price
- ProductConference and Workshop Ticket, Price300EUR
- Conference Ticket, 200EUR
- Workshop Ticket, 150EUR
Product can have a name style "Conference and Workshop Ticket" or "Conference Name: Conference and Workshop Ticket". Both are possible, but in the case of the first option we still need to display the conference name somewhere on the Invoice - the header area can be used for this, in the second case we will have 3x Product on the registration form starting the same way, i.e. "Conference name: ...". The second option is probably better, because we can easily overwrite the name when building the form. And in Stripe it will be clearer, in case of multiple conferences there will not be several times nothing saying "Conference Ticket".
Next, in the Settings " Invoice template https://dashboard.stripe.com/settings/billing/invoice section we will set the default values for Invoice.
2. Registration form page
First we will install the Stripe module https://www.drupal.org/project/stripe. In the settings we fill in the Stripe API keys.
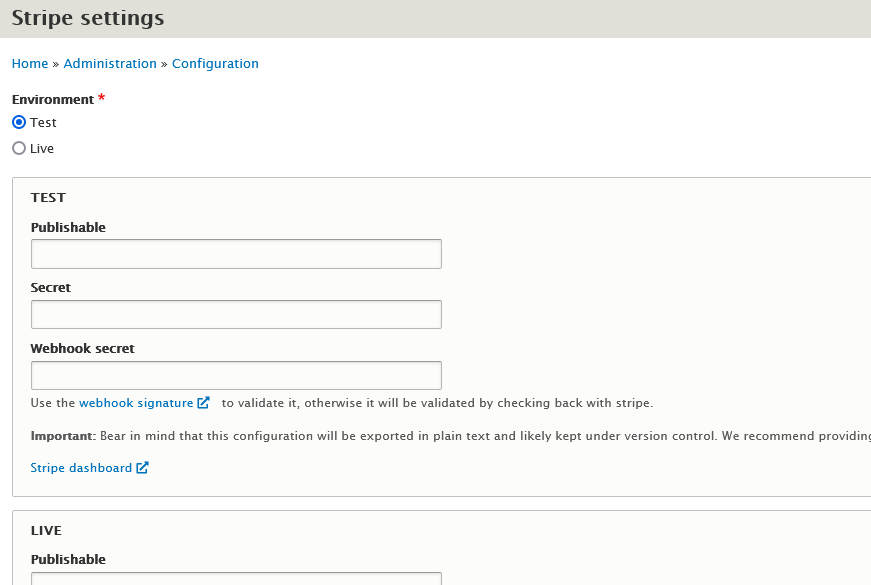
Note that in the current version of the module 8.x-1.0 the keys are then exported in the configuration. The Stripe Live Secret key should not appear anywhere like this. Instead, you can define everything in the settings.php file:
$config['stripe.settings']['environment'] = 'test';$config['stripe.settings']['apikey']['test']['public'] = 'pk_test_...';$config['stripe.settings']['apikey']['test']['secret'] = 'sk_test_...';But this one is probably found in versioning systems, backups. So you can include the Live secret key from, say, settings.php from some file completely outside:
if (file_exists('/etc/stripe.conf')) { include_once('/etc/stripe.conf');}The Stripe API module https://www.drupal.org/project/stripe_api (I haven't tested it) stores API keys using the Key module https://www.drupal.org/project/key, so it's safer.
The following is the registration form. To make it universal, I created it as follows. In Drupal, I have a node of type Event, and the page consists of Paragraphs. One is defined as Stripe, has button name fields and then an unlimited number of Stripe_Product_Ids fields. Below is a sample of parts of the code.
Reading the library:
using Stripe\StripeClient;Getting the keys as configured, creating a Test or Live connection to Stripe:
$config = \Drupal::config('stripe.settings');$stripe = new StripeClient($config->get('apikey.' . $config->get('environment') . '.secret'));An example of getting the Price object according to the given Price ID (we get e.g. the specified price and currency), and then getting the Product object, where we get e.g. Product name:
$price = $stripe->prices->retrieve($price_id)->toArray();$product = $stripe->products->retrieve($price['product'])->toArray();All well documented https://stripe.com/docs/api?lang=php.
The form then consists of a generated Stripe Products section, depending on which node I'm coming from. Based on the Price IDs I enter, I find the associated Product, whose name I display as the ticket name. The second part of the form is then universal - first name, last name, email. This form is generated by our own custom module, so it can be used to register for other events. Maybe a webform could be used as well, but I went the custom form route.
3. Summary page
This page is just a summary for the customer to see what ticket they have chosen and what information they have entered. Also there is the total price, which can be increased by tax (VAT) for example, or on the other hand reduced when using some discount coupon - that is if we implement it. I transfer data between pages using Drupal sessions.
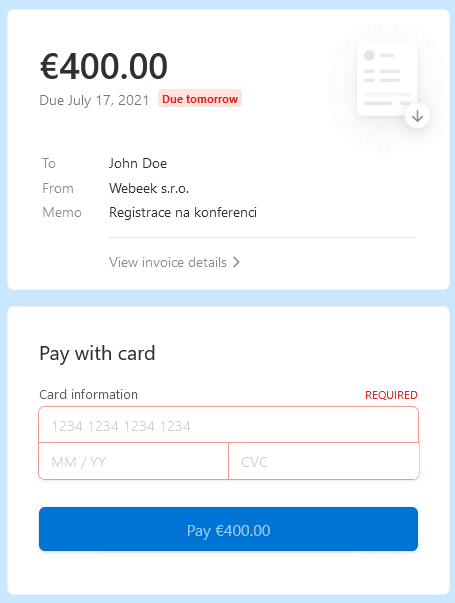
$session = \Drupal::request()->getSession();$details = ($session->get('stripe_payment.details')) ? $session->get('stripe_payment.details') : [];...$session->set('stripe_payment.details', $details);The most important thing here is the button to confirm and complete the registration. When you press it, communication with Stripe happens in the background, resulting in the creation of an Invoice object. This also contains the URL where the actual payment takes place (Hosted invoice page), and we can redirect the customer to it directly. However, I prefer to show the customer first a "Thank you" page with some confirmation/thank you text and information that the Invoice (the document preceding the payment) has just been sent to the specified email. And then there is also a link to the Hosted invoice page on the "Thank you" page.
Automatically sending the Invoice is optional, but definitely expected I think. Again, the email includes a link to the Hosted Invoice page, and this can also be part of the PDF Invoice attachment.
4. Stripe Hosted Invoice page
After confirming registration - see. previous page - the following actions occur in the background:
- Take the specified email, and test if there is already a customer with that email (List all customers with the email parameter https://stripe.com/docs/api/customers/list)
- we either create or update the customer (first name, last name ...)
- we create an Invoice $invoice = $stripe->invoices->create($invoice_template); (Create an invoice https://stripe.com/docs/api/invoices/create), to which we add the appropriate Invoice Items $stripe->invoiceItems->create($item); (Create an invoice itemhttps://stripe.com/docs/api/invoiceitems/create). The Invoice item actually corresponds to the selected ticket, i.e. Price Id.
- Finally, the Invoice must be finalized $invoice->finalizeInvoice(); and possibly marked to be sent to the customer $invoice->sendInvoice();
As mentioned earlier, the finalized Invoice also includes the URL to the Hosted invoice page.
This is what the code for creating an Invoice might look like:

Hosted invoice page:
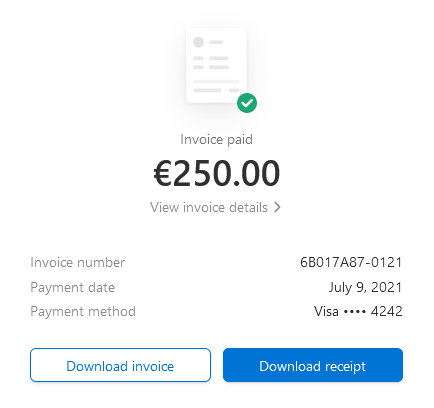
5. Successful payment
If the payment was successful, the given Hosted invoice page will change, it now shows that the payment is made, and along with the Invoice there is now a Receipt = receipt to download. Again, this can be sent automatically via email.
If we have set up the appropriate Webhook, e.g. for the event invoice.paid or payment_intent.succeeded, we should get a response, i.e. some JSON object, to the given Endpoint URL. We can use this to, for example, self-notify that a payment has been made by a customer with the name ... and email ..., or to send some additional information (access password ...) to the customer. Unfortunately, the webhook does not allow you to define any conditions, e.g. that it is a payment for Product XYZ.
6. BONUS: SalesForce and Hopin
And it's time for the promised bonus. SalesForce CRM probably needs no introduction, Hopin is a popular conferencing platform for online events.

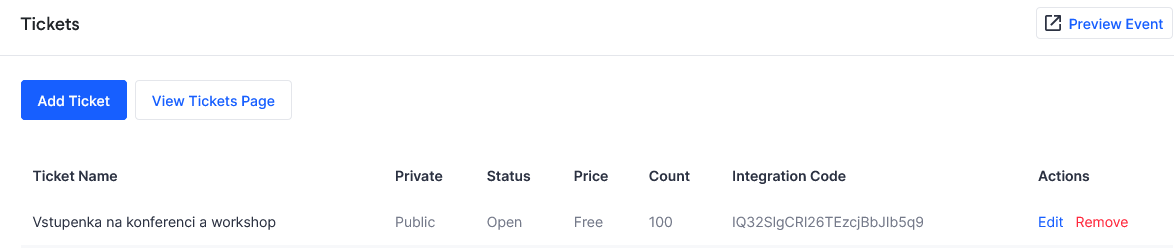
Let's just take a quick tour. In Hopin we can create an Event, and define Tickets for it. Each Ticket has a so-called Integration code. Unfortunately, the options for direct Stripe integration are very limited. Hopin Tickets correspond to Stripe Prices/Products.
At the same time you need to create SalesForce Campaigns, again each campaign corresponds to one Hopin Ticket. In the campaign definition, you can define a Hopin integration code field where you enter the appropriate code. This functionality needs to be enabled and configured, see the tutorials https://hopin.com/integrations/salesforce and https://hopin.zendesk.com/hc/en-us/articles/360059577592-Integrating-Sa….
So if someone buys Stripe Product#1, we can use webhooks to add a new Campaign Member in SalesForce to the corresponding Campaign that is linked to Hopin, so that it automatically creates a so-called Magic Link Invites on the Hopin side, which will be transferred back to the SalesForce Campaign Member object as well.
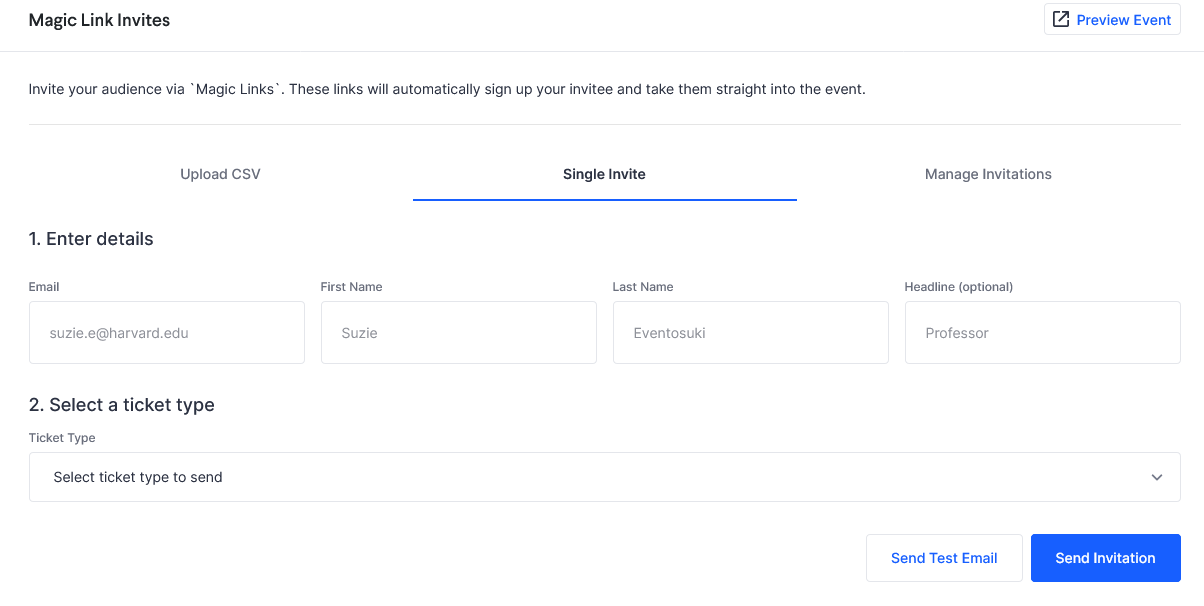
Now we can manually send an invitation to a customer via Hopin - Send Invite, or maybe we can automate it via SalesForce.
Quite an ingenious concatenation, isn't it?
Conclusion
In this last and I suppose most interesting episode, we showed how to create a whole process to register for our some virtual event. We used Stripe itself to do this, as well as the Stripe module for Drupal, along with our custom registration module.
Stripe's chosen solution is called Invoicing https://stripe.com/en-cz/invoicing, or Hosted invoice pagehttps://stripe.com/docs/invoicing/hosted.
And as a bonus, we've shown that linking this to Hopin online event platform, or even SalesForce using the so-called Magic links, is very easy, and we can automate the whole registration process.
There are a lot of ways to use Stripe. This was just a small sample of the way that seems best for my needs at the moment. Stripe is a very open system - you can easily set up an account yourself and get to testing without any limits or restrictions. You can get started right now!